检查IP各种属性的网站
检测IP伪装网站WHOER:
检测IP地址类型:
检查IP欺诈值:
检查IP的路由信息:
IPv4https://tools.ipip.net/traceroute.php
IPv6https://www.itdog.cn/ping_ipv6
IPv4https://tools.ipip.net/traceroute.php
IPv6https://www.itdog.cn/ping_ipv6
/48 `/64` PD的IPV6,文章使用HE免费IPV6echo "net.ipv4.ip_forward = 1" >> /etc/sysctl.conf
echo "net.ipv4.conf.all.forwarding = 1" >> /etc/sysctl.conf
echo "net.ipv6.conf.default.forwarding = 1" >> /etc/sysctl.conf
echo "net.ipv6.conf.all.forwarding = 1" >> /etc/sysctl.conf
echo "net.ipv6.conf.all.proxy_ndp = 1" >> /etc/sysctl.conf
echo "net.ipv6.conf.all.accept_ra = 2" >> /etc/sysctl.conf
sysctl -p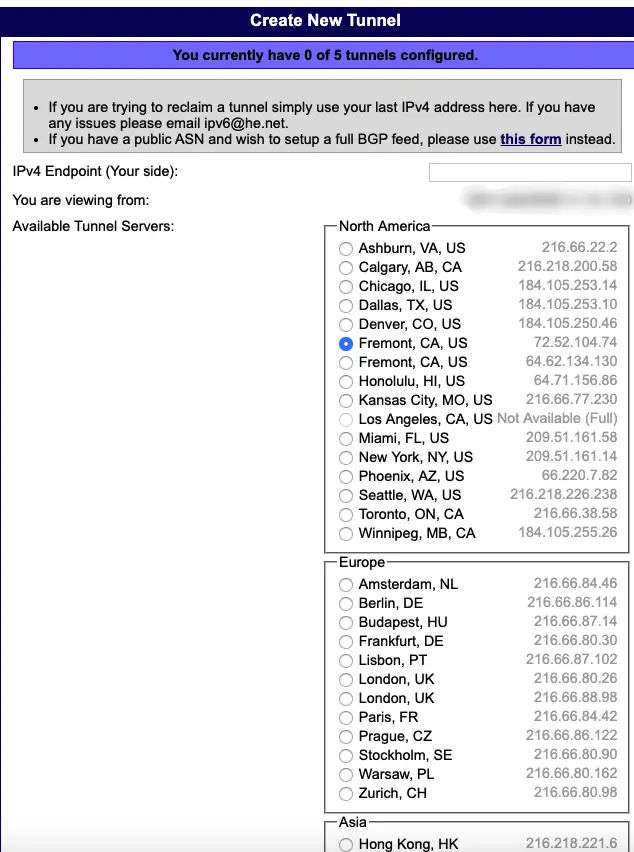
创建完成之后,会获得一个IPV6 /64的网络块
只有热门的地区才能申请/48的网络块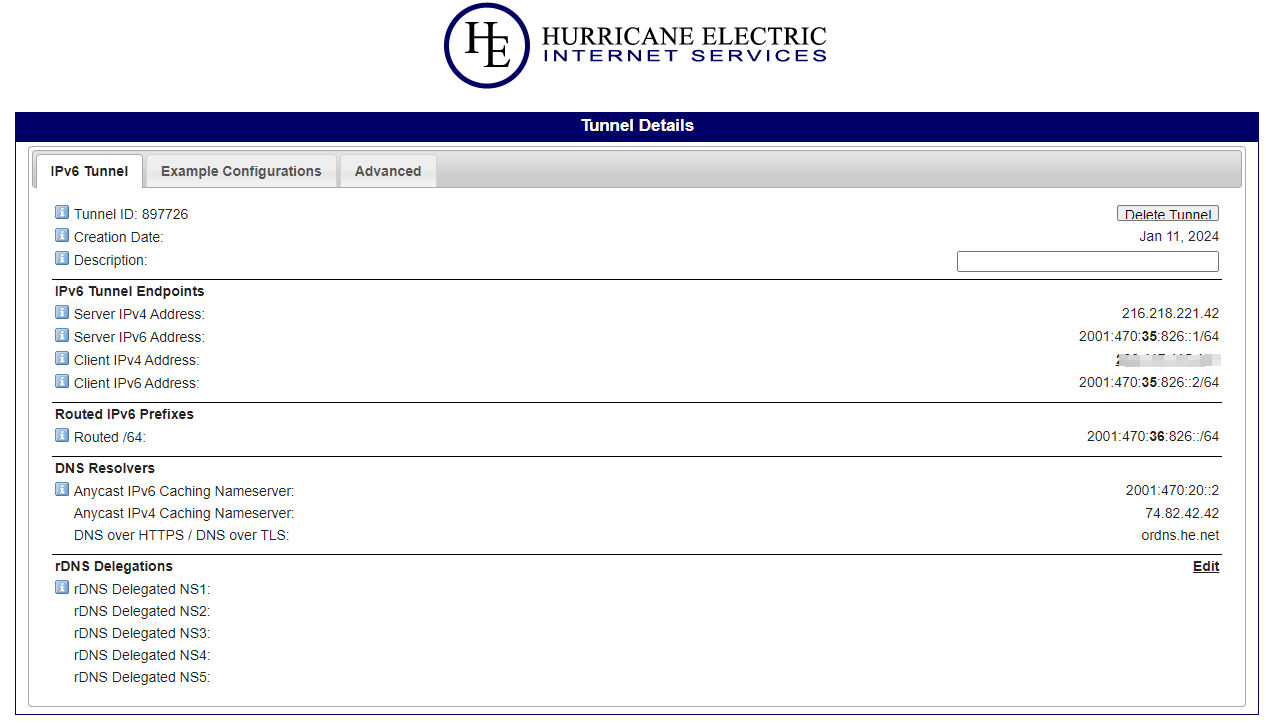
IPv6 Tunnel Block
这里获取到了一个IPV6的地址
Routed IPv6 Prefixes : 2001:470:36:826::/64
IPv6 Tunnel Endpoints
Server IPv4 Address:216.218.221.42
Server IPv6 Address:2001:470:35:826::1/64
Client IPv6 Address:2001:470:35:826::2/64
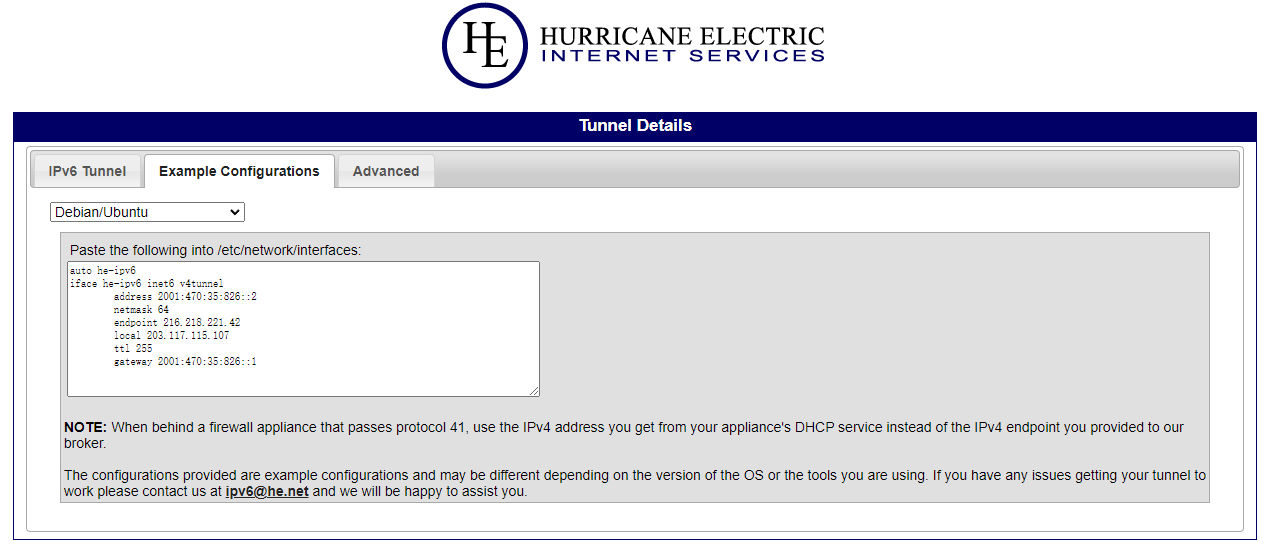
local 10.10.201.213 修改为自己机器的外网网卡的IP,建议显示什么就填什么allow-hotplug 设置为 auto 否则重启网卡概率会失联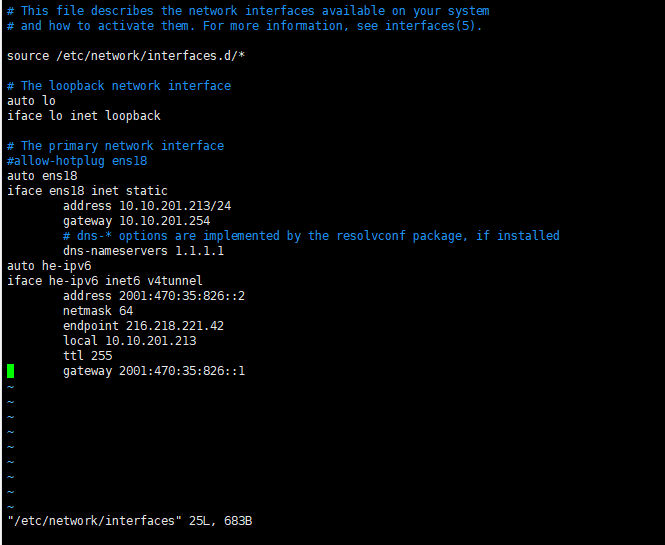
/etc/init.d/networking restart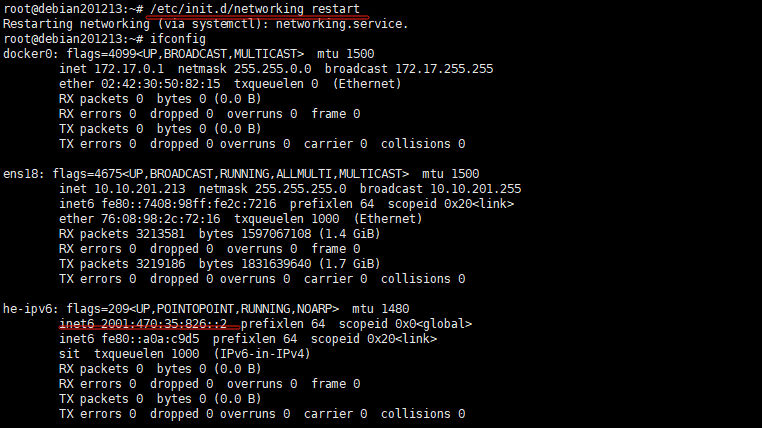
**借助itdog查询地址**
查询地址 : https://www.itdog.cn/ping_ipv6/2001:470:35:826::2

**成功获取到可用IPV6**
**因为有延迟返回,所以该地址是成功设置上的了**
## 使用Zerotier One来广播IPV6
- 只要连接上zerotier one的所有机器,都可以获得一个ipv6的公网地址
- 建议国内用户不要这么操作,体验很差,国外的机器没有ipv6都可以获得一个不错的体验
- 创建 [Zerotier One
账户](https://www.nodeseek.com/jump?to=https%3A%2F%2Fmy.zerotier.com%2F)
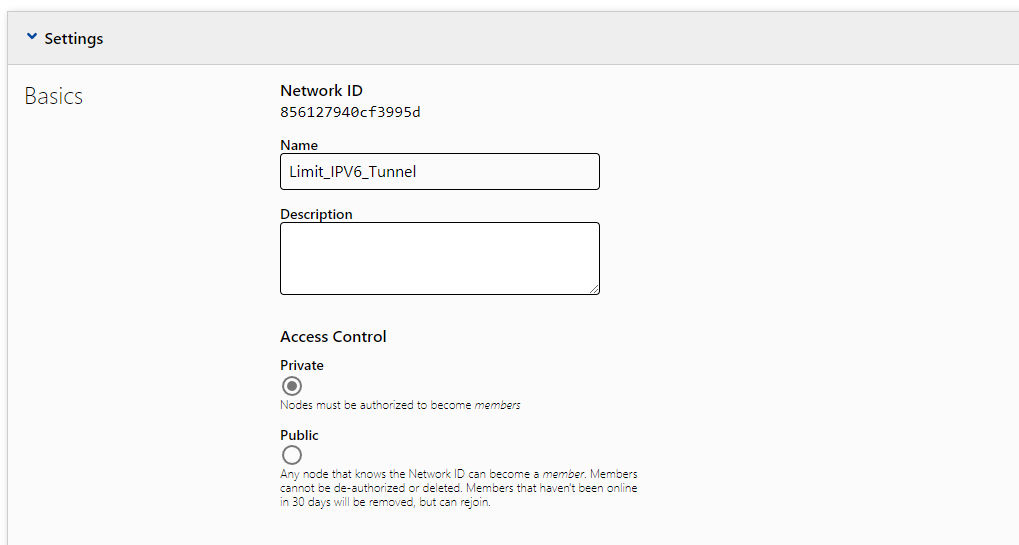
- 创建网络,由下图可见 Network ID为 `856127940cf3995d`
**提前规划好 内网 IPV4 + IPV6 以及公网IPV6
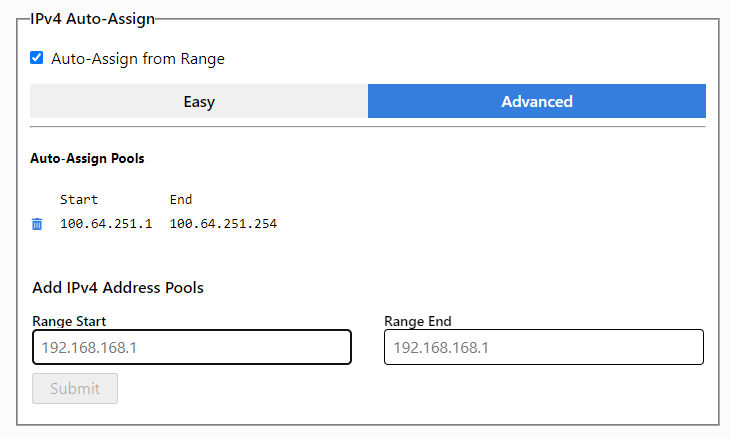
内网IPV4**
> 我这边使用的是
> 100.64.251.1~100.64.251.254
> 你们可以自行设置,无需和我一样,任意设置即可
**内网IPV6**
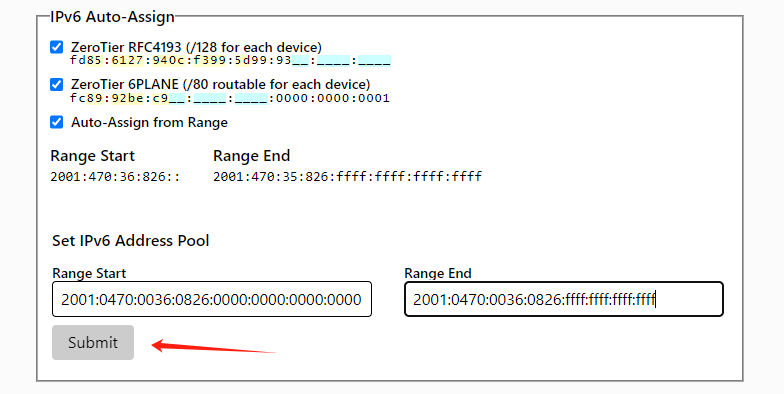
- 两个选项默认打开,无需修改任何
- 记住`ZeroTier RFC4193`这个后续路由需要用到
ZeroTier 6PLANE (/80 routable for each device)
公网IPV6 HE Tunnel
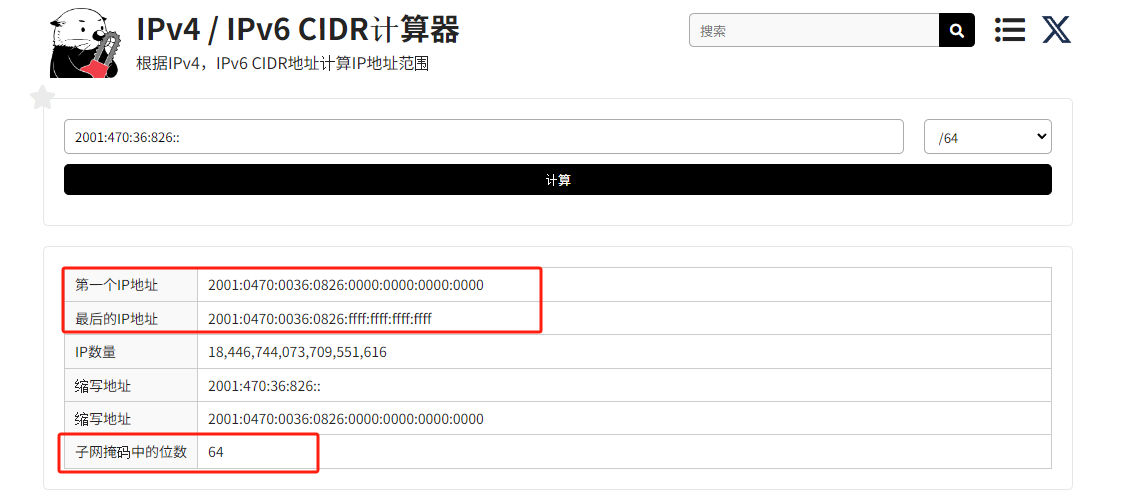
/64 作为演示2001:470:36:826::/64借助IPV6在线计算器
| 信息 | 地址 |
|---|---|
| 第一个IP地址 | 2001:0470:0036:0826:0000:0000:0000:0000 |
| 最后的IP地址 | 2001:0470:0036:0826:ffff:ffff:ffff:ffff |
| 子网掩码中的位数 | 64 |
路由设置
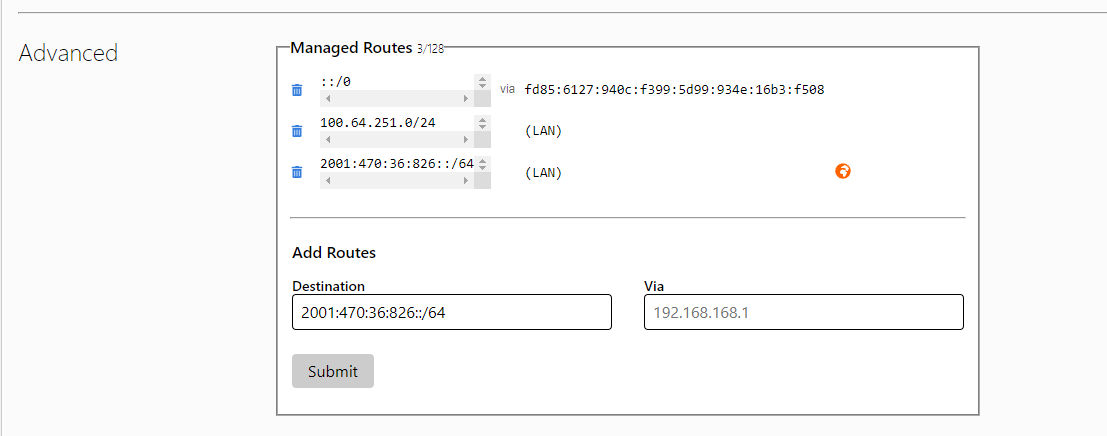
| 目标地址 | 类型 | 路由地址 | 备注 |
|---|---|---|---|
| 100.64.251.0/24 | (LAN) | 默认存在 | |
| ::/0 | Via | fd85:6127:940c:f399:5d99:934e:16b3:f508 | 下文会提及这个地址 |
| 2001:470:36:826::/64 | (LAN) |
HE Tunnel机器加入Zerotier
856127940cf3995d 是自己创建的Network ID上文有提及curl -s https://install.zerotier.com | sudo bash
sudo zerotier-cli join 856127940cf3995d
sudo zerotier-cli set 856127940cf3995d allowGlobal=true
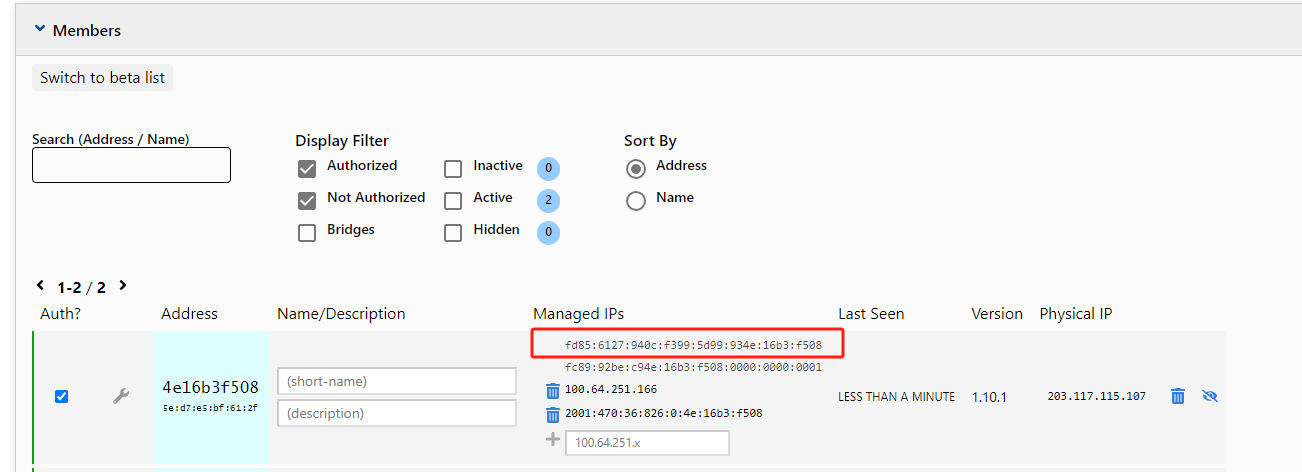
sudo zerotier-cli set 856127940cf3995d allowDefault=1查看Zerotier Webui的机器信息
/64 的地址请注意下图红框的地址
配置IPV6广播
安装 ndppdapt-get -y install ndppd
/etc/ndppd.conf
ens18 替换为自己的外网网卡地址route-ttl 30000
address-ttl 30000
proxy ens18 {
router yes
timeout 500
autowire no
keepalive yes
retries 3
promiscuous no
ttl 30000
rule 2001:470:36:826::/64 {
auto
autovia no
}
}重启服务,验证
sudo systemctl restart ndppd
sudo systemctl status ndppd你会发现有Error 不要慌,再重启一次
正常了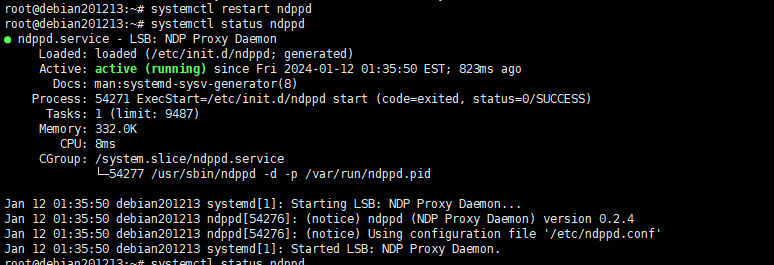
以亚马逊AWS Debian为例
curl -s https://install.zerotier.com | sudo bash
sudo zerotier-cli join 856127940cf3995d
sudo zerotier-cli set 856127940cf3995d allowGlobal=true
sudo zerotier-cli set 856127940cf3995d allowDefault=1查看信息
root@ip-172-31-2-228:~# ifconfig
ens5: flags=4163<UP,BROADCAST,RUNNING,MULTICAST>  mtu 9001
        inet 172.31.2.228  netmask 255.255.240.0  broadcast 172.31.15.255
        inet6 fe80::87b:d8ff:fee5:87d6  prefixlen 64  scopeid 0x20<link>
        ether 0a:7b:d8:e5:87:d6  txqueuelen 1000  (Ethernet)
        RX packets 33376  bytes 38576966 (38.5 MB)
        RX errors 0  dropped 0  overruns 0  frame 0
        TX packets 11951  bytes 1224372 (1.2 MB)
        TX errors 0  dropped 0 overruns 0  carrier 0  collisions 0

lo: flags=73<UP,LOOPBACK,RUNNING>  mtu 65536
        inet 127.0.0.1  netmask 255.0.0.0
        inet6 ::1  prefixlen 128  scopeid 0x10<host>
        loop  txqueuelen 1000  (Local Loopback)
        RX packets 258  bytes 26489 (26.4 KB)
        RX errors 0  dropped 0  overruns 0  frame 0
        TX packets 258  bytes 26489 (26.4 KB)
        TX errors 0  dropped 0 overruns 0  carrier 0  collisions 0

ztcfw5idkr: flags=4163<UP,BROADCAST,RUNNING,MULTICAST>  mtu 2800
        inet 100.64.251.215  netmask 255.255.255.0  broadcast 100.64.251.255
        inet6 2001:470:36:826:0:c2:a026:26f5  prefixlen 64  scopeid 0x0<global>
        inet6 fc89:92be:c9c2:a026:26f5::1  prefixlen 40  scopeid 0x0<global>
        inet6 fd85:6127:940c:f399:5d99:93c2:a026:26f5  prefixlen 88  scopeid 0x0<global>
        inet6 fe80::5c5b:53ff:fe2a:b2d2  prefixlen 64  scopeid 0x20<link>
        ether 5e:5b:53:2a:b2:d2  txqueuelen 1000  (Ethernet)
        RX packets 1948  bytes 2811480 (2.8 MB)
        RX errors 0  dropped 0  overruns 0  frame 0
        TX packets 871  bytes 85221 (85.2 KB)
        TX errors 0  dropped 0 overruns 0  carrier 0  collisions 0
可以看到已经获取到了IPV6
地址为 2001:470:36:826:0:c2:a026:26f5
借助ITdog进行测试
aws机器安装nginx测试IPV6访问情况
apt-get -y install nginx借助ITdog进行测试 Nginx
docker-compose.yaml
version: '3'
services:
  zerotier-one:
    image: henrist/zerotier-one
    container_name: zerotier-one
    restart: unless-stopped
    network_mode: host
    cap_add:
      - NET_ADMIN
      - SYS_ADMIN
    devices:
      - /dev/net/tun
    volumes:
- ./zerotier-one:/var/lib/zerotier-one注意:并不推荐这么做,因为这会降低ip库的定位质量,同时,使用warp也有滥用的嫌疑
如果你对BGP感兴趣,希望注册自己的asn可参考这篇文章 [ASN 注册指南 - RIPE NCC 篇 [教程向]](https://www.nodeseek.com/post-16272-1)
找到各大IP库,通过他们的在线表单发送IP更正请求
常用的更正有以下几个,其实只提交maxmind即可(有些数据商甚至没有ipv6的信息所以交了也没用)
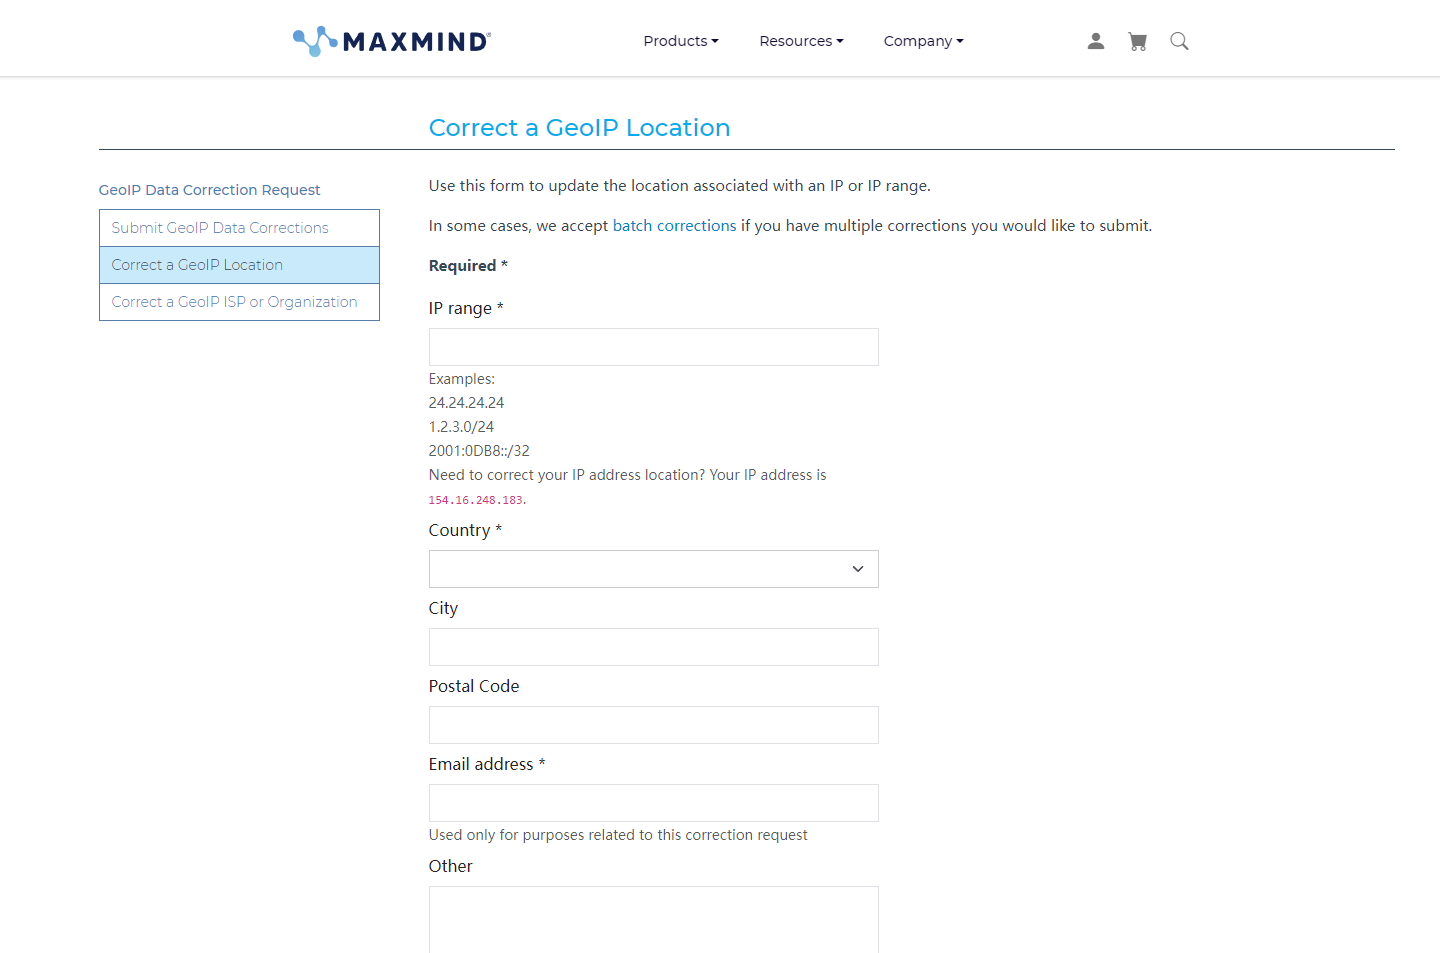
也可以通过Geofeed的方式批量提交请求,对于ip较多且经常变更的情况较为常用(很多大型网络通常会使用这种方式更正定位)
此外,如果你拥有IP段相应IrrDB的编辑权限,建议将country项修改为AQ,再进行广播,否则可能出现许多定位位于US的情况
等待几天后,往往ip库就会开始更改(如果你的请求不是特别离谱),这时候我们可以用iplocation.io这个站点批量查询各大ip数据库中我们的ip信息,等到数据完成更改后,我们就可以进行下一步操作了
如果你闲的蛋疼想测试流媒体情况,可以使用Neko的流媒体测试脚本(相比其它的个人认为测试速度最快)
bash <(curl -Ls unlock.moe)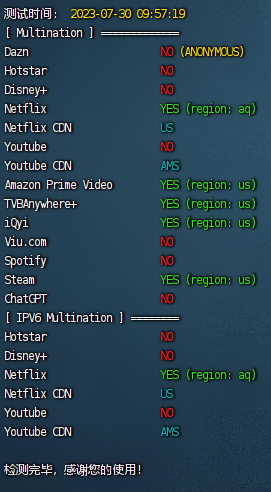
由于我们目前只有ipv6,所以大部分网站我们无法使用我们已经完成修改的“南极”ip访问,这时候就需要借助warp来帮忙了。
warp有一个特性,就是他会根据用户连接ip而不是节点所在地为用户分配相应归属地的ip(举例:大陆连接warp,往往会连接到美国服务器,但获取到的ip定位通常是位于大陆),因此我们可以利用这一点来得到一个定位位于南极的warp ip。
这里需要注意一点,服务器使用warp上网会明显降低网络性能,因此我们不采用传统的wireguard+直接配置系统路由的方式,而是采用wireproxy创建socks5,再使用xray的自定义路由规则进行分流代理(反正你服务器有v4也不需要warp的v4)
这里采用了最常用的一个warp脚本
wget -N https://raw.githubusercontents.com/fscarmen/warp/main/menu.sh && bash menu.sh选择13安装wireproxy,我这里已经安装过了所以不截图安装过程了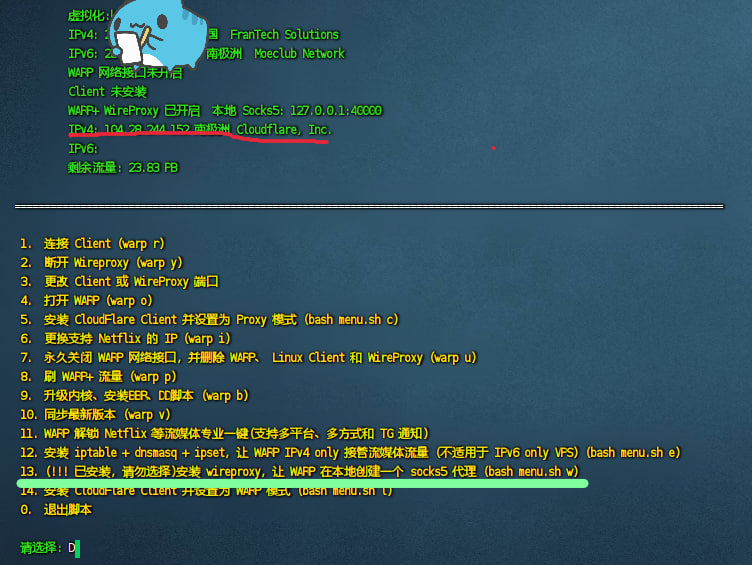
如果你需要使用warp+,telegram上有些频道会分享免费的warp+密钥,如 https://t.me/warpplus 等,一切就绪后,不出意外脚本会提示创建成功随后显示warp的ipv4地址(我在尝试的时候他检测不出来ipv6,实际是有的),但是默认他会使用ipv4连接warp,所以获取的地址定位位于美国。
我们输入warp y断开wireproxy,随后编辑/etc/wireguard/proxy.conf
我们需要修改连接的endpoint,将其手动设置为ipv6地址(这样就能使用南极定位的ipv6连接warp从而获得相应的定位)
这里提供一个endpoint地址作为参考
[2606:4700:d0::a29f:c001]:2408保存,并使用warp y重新启动wireproxy。
此时如果设置均正确,你应当看到以下输出: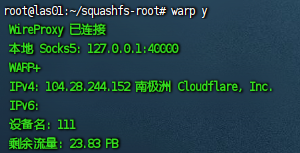
使用curl测试一下:
root@las01:~/squashfs-root# curl ipinfo.io --socks5 127.0.0.1:40000
{
  "ip": "104.28.244.152",
  "city": "McMurdo Station",
  "region": "Antarctica",
  "country": "AQ",
  "loc": "-77.8463,166.6682",
  "org": "AS13335 Cloudflare, Inc.",
  "timezone": "Antarctica/McMurdo",
  "readme": "https://ipinfo.io/missingauth"
}
我们此时已经成功获取到了一个warp的南极IP
这里我使用的是xrayr,如果配置方法和原版xray-core有区别请自行修改
创建一个出站,tag随意,我这里用的示例的media-unlock懒得改了
  {
    "tag": "IPv4_out",
    "protocol": "freedom",
    "settings": {}
  },
  {
    "tag": "IPv6_out",
    "protocol": "freedom",
    "settings": {
      "domainStrategy": "UseIPv6"
    }
  },
  {
    "tag": "media-unlock",
    "protocol": "socks",
    "settings": {
        "servers": [
          {
            "address": "127.0.0.1",
            "port": 40000,
            "users": []
          }
      ]
  }
  },
  {
    "protocol": "blackhole",
    "tag": "block"
  }
随后增加一个route rules,令全部tcp流量走“media-unlock”出站
  "rules": [
    {
      "type": "field",
      "outboundTag": "block",
      "ip": [
        "geoip:private"
      ]
    },
    {
      "type": "field",
      "outboundTag": "block",
      "protocol": [
        "bittorrent"
      ]
    },
    {
      "type": "field",
      "outboundTag": "media-unlock",
      "domain": [],
      "network": "tcp"
    },
    {
      "type": "field",
      "outboundTag": "IPv6_out",
      "domain": [
        "geosite:netflix"
      ]
    },
    {
      "type": "field",
      "outboundTag": "IPv4_out",
      "network": "udp"
    }
  ]
理论上已经可以使用了,此外该IP在B站评论是可以显示南极洲的
